Monday, October 31, 2011

SuperLevi needs your help...

The family of "Two Pitties in the City", is fostering a wonderful little pittie named Levi.  I have been following the story of Levi for quite some time, why...because I read the blog everyday and he's the cutest little guy (plus, he may have been raised by super heroes).  Well...checking out the blog on Thursday (27 October 2011) I found out that little Levi is in need of surgery to save his eyesight. 

The "Two Pittie..." people have pulled together a couple of fundraisers in order to raise the money for Levi's surgery.  They are having a super hero themed walk  and they are also having a raffle of their favorite things (Dog Backpack, GoPro Camera, Dog Sweater, Ruffwear Coat).

I have already purchased my gear for the walk on Nov. 12., but I will also be donating 2 raffle prizes to the cause.  They will be doggie care packages that will include:

Homemade dog treats (by yours truly) with cookie cutters, and the recipe (plus other lil surprises in the box in the form of my chosen packing materials:  some semi-handcrafted and some absolutely fun).


Please check out "Two Pitties in the City" for further details on the walk and the raffle, I have included the links below.  Lets help SuperLevi save his X-ray vision.


Thursday, July 28, 2011

Cookin' it old school...Cast Iron and Cornbread

Cornbread
I had a "cookin' it old school" moment the other day when I made my contribution to Sunday dinner at my sister's home.  When I think about "cookin' it old school", the thing that comes to mind is making classic recipes with classic tools...in this instance it was making cornbread in my 10in smooth cast iron skillet.  

Smooth cast iron has become an obsession of mine...the classic cookware was the original non-stick pan, but now they are languishing away in thrift stores and antique shops; unloved, lonely, and dusty.  

My first piece of smooth cast iron came from my mother in the form of a Griswold, #6, 6in. skillet.  This skillet had belonged to her mother, my grandmother, "Good Mama" (we're from Kentucky).  I couldn't believe how smooth this little skillet was; it was like looking into black glass.  It fried an egg with the greatest of ease, no sticking...much easier than those skillets you buy at big box stores that are supposedly seasoned.  I was hooked, but my mom was not going to relinquish any more pieces to me...something about prying it from her cold hand (again, we're from Kentucky).  So at this point, I realized I would have to keep an eye open on Ebay, antique shops and thrift stores that I frequented in order to round out my cooking collection.

The last few years I have been on the look out for the perfect skillets/griddles for my home.  I have been able to acquire a perfect unmarked smooth cast iron 10in. skillet (no rust, like new and you can see the machine marks in it, supposedly from the '40s according to the vendors tag), a Wagner Ware Juinor Krispy Korn Kob Baker, and as of this afternoon a #9 Griswold griddle.  These pieces that grace my home now, once helped get food on the table for a family, they stayed on the stove ready to heat up at a moments notice, they have seen joy and tragedy, these pieces are what helped shaped cooking in America.  

Now to get back to "cookin' it old school"...I wanted to make cornbread for Sunday dinner at my sisters; what better way to bake it, but in a cast iron skillet. 

Cornbread from "William Sonoma's Comfort Food" cookbook
For printable recipe, please click here 

1 C  AP Flour
1 C  Yellow Cornmeal
¼ C  Sugar
¾ tsp  Baking Soda
½ tsp  Sea Salt
⅛ tsp  Cayenne Pepper
⅛ tsp Cinnamon *(this was my little addition)
⅔ C  Sour Cream
⅔ C  Whole Milk
2 Lrg Eggs
6 Tbsp  Unsalted Butter, melted *(I use TJ’s salted butter)
¾ C  Corn Kernals, fresh or thawed frozen

Preheat the oven to 400⁰F.  Butter a 10in. cast iron skillet (or other oven safe skillet or baking dish), set aside.  In a large bowl, whisk together the flour, cornmeal, sugar, baking soda, salt and cayenne pepper.  In another bowl, whisk together the sour cream, milk and eggs until blended.  Make a well in the center of the cornmeal mixture, pour in the sour cream mixture and melted butter and stir just until combined.  Do not over mix.  Fold corn kernels into the batter.

Pour the batter into the prepared skillet and smooth the top.  Bake until the corn bread is golden brown and it passes a tooth pick test, about 20 min.  Let cool in pan for 5 min.  Cut into wedges and serve warm with butter.

Cornbread in my 10in. cast iron skillet
Sunday Dinner with Cornbread

One of the other guests at dinner seemed shocked that the cornbread did not stick to the skillet when I was getting it out, I just smiled...its the original non-stick cookware, plus I slathered the skillet with butter before I put the batter in it. 

The cornbread was moist and delicious, plus I got to showcase my cast iron. 

Enjoy the foods of your labor.  :-)

Friday, June 24, 2011

Death by chocolate cake...TAKE TWO

Devil's Food Layer Cake
Take two on Devil's Food Cake...why "take two" you ask?  Well, this is a blog entry that I have been working on for about 2 weeks.  I had the story part done, but needed to type up the recipe.  The blog entry was funny; it made reference...an homage if you will...to my favorite comedian; it was filled with word imagery that would get you to bake this cake in a heartbeat; it was a masterpiece that would win me many blog awards in the near future.  Still confused why you are not reading this glorious blog entry and instead of reading a description about it???  WELL, in the process on working on the recipe from Williams Sonoma's "Comfort Foods" Cookbook  I deleted it; in one STUPID keystroke the whole thing was gone and no cache memory, back button or any such trick could save it *sigh*.   So instead of trying to recreate genius, I am writing this to let you know that it was wonderful, it is gone and I have to move on with my life *sob*.


So now to let you know about this cake and why you should make it.  This cake is beyond good...IT'S GREAT!!!  It is not a very difficult cake and it bakes up perfectly, I have made it as a layer cake (as you saw above) and as a sheet cake (not pictured).  Both baked up perfectly.  The cake feels dense, but the crumb is velvety creating beautiful slices to impress all that see it.  The first bite is so decadent that you will have to control yourself from forgoing a fork and cramming the cake in your mouth with your hands.  The frosting is smooth, creamy and ever so sweet that you may get cavities looking at it and it works in perfect unison to dress the cake for a night on the town (heck the frosting is sooo good that even my mom wants the recipe and she never asks me for recipes...I told her, "you can get it on my blog"  :-P  ).  If you love cake, if you love chocolate...your search is over, this is the cake for you.


Devil's Food Layer Cake
From William Sonoma's Comfort Foods Cookbook
For printable recipe, please click here

For the cake: 
1 C  Boiling Water 
¾ C  Unsweetened Natural Cocoa Powder 
1¾ C  AP Flour 
1½ tsp.  Baking Soda 
½ tsp.  Fine Sea Salt 
2 C  Granulated Sugar 
½ C + 2 Tbsp  Unsalted Butter, at room temperature*
3  Eggs 
1 tsp.  Vanilla Extract  
1 C  Buttermilk
 
Preheat an oven to 350°F. Lightly butter two 9-inch round cake pans. Line the bottom of each pan with a round of parchment paper. Dust the pans with flour, tapping out the excess.

In a small heatproof bowl, whisk together the boiling water and cocoa powder until smooth. Let cool completely.

In a bowl, sift together the flour, baking soda and salt. Set aside.

In a large bowl, using a handheld mixer, beat together the granulated sugar and butter on medium-high speed until the mixture is light in color and texture, about 3 minutes. Beat in the eggs, one at a time, then beat in the vanilla and the cooled cocoa mixture.

Reduce the speed to low and add the flour mixture in 3 additions, alternating with the buttermilk and beginning and ending with the flour mixture. Beat until smooth, stopping the mixer occasionally to scrape down the sides of the bowl. Divide the batter evenly between the prepared pans and smooth the tops.

Bake the cakes until they begin to pull away from the sides of the pans, 35 to 40 minutes. Transfer the pans to wire racks and let cool for 15 minutes. Run a knife around the inside of each pan to release the cake. Invert the pans onto the racks, lift off the pans and peel the parchment paper off the cakes. Turn the cakes right side up and let cool completely.


For the chocolate frosting: 
3 ¾ C  Powdered Sugar 
1 C Unsweetened Natural Cocoa Powder  
8 Tbs. (1 stick)  Unsalted Butter, at room temperature*
1 tsp.  Vanilla Extract  
1 C  Heavy Cream, or as needed  

In a bowl, sift together the confectioners’ sugar and cocoa powder. Using the mixer, beat in the butter on low speed until it is crumbly. Beat in the vanilla, then gradually beat in enough of the cream to make a spreadable frosting.

Place 1 cake layer, bottom side up, on a cake plate. Using an icing spatula, spread the top of the layer with a generous 1/2 cup of the frosting. Place the second layer, top side down, on top of the first layer. Frost the top and then the sides with the remaining frosting. Slice the cake into thick wedges and serve. Serves 10.

*I use Trader Joe's salted butter.

Devil's Food Layer Cake -

Devil's Food Layer Cake

  
So in the word's of Eddie Izzard, "Cake or Death?" ...  I choose cake.
Enjoy the foods of your labor.  :-)

Devil's Food Layer Cake


Friday, June 3, 2011

That's one spicy meatball...

Spaghetti and Meatballs
This has been the week from hell...stress X50.  I have felt like I was running around in circles all day only to come home and just feel totally frayed at the seams.  Wednesday night at 8pm I was totally convinced that the only way to feel better was to make spaghetti and meatballs...surprisingly it worked.  Some how the process of making meatballs took almost all of my stress away...so much so that I didn't even mind doing the dishes.

Marinara
For printable recipe, please click here
2 (28 oz) cans  Plum Tomatoes with juice, each tomato crushed by hand
1 (6 oz) can  Tomato Paste
2 small  Onions, chopped
4 cloves of Garlic, finely chopped
3 Tbsp  Olive Oil
Oregano
Basil
Parsley
Onion Powder
Garlic Powder
Chili flake
¼ C  Pasta Water

In a pan/Dutch oven (at least 5qt); sauté the garlic and onion in olive oil.  Once the onions start to become translucent add the tomatoes and the spices (to taste).  Stir in pasta water.  Taste the sauce before adding any salt, the pasta water will already have salt in it so it may not be needed.  Simmer together until cooked through, at least 20 min.

Meatballs
For printable recipe, please click here
2 lbs. Ground Beef (80/20 or 85/15)
2 Eggs, beaten
1 C  Saltine Crackers, smashed (about half a sleeve of saltines)
4 cloves of Garlic, finely chopped
Onion Powder
Garlic Powder
Red Chili Flake
Salt and Pepper 

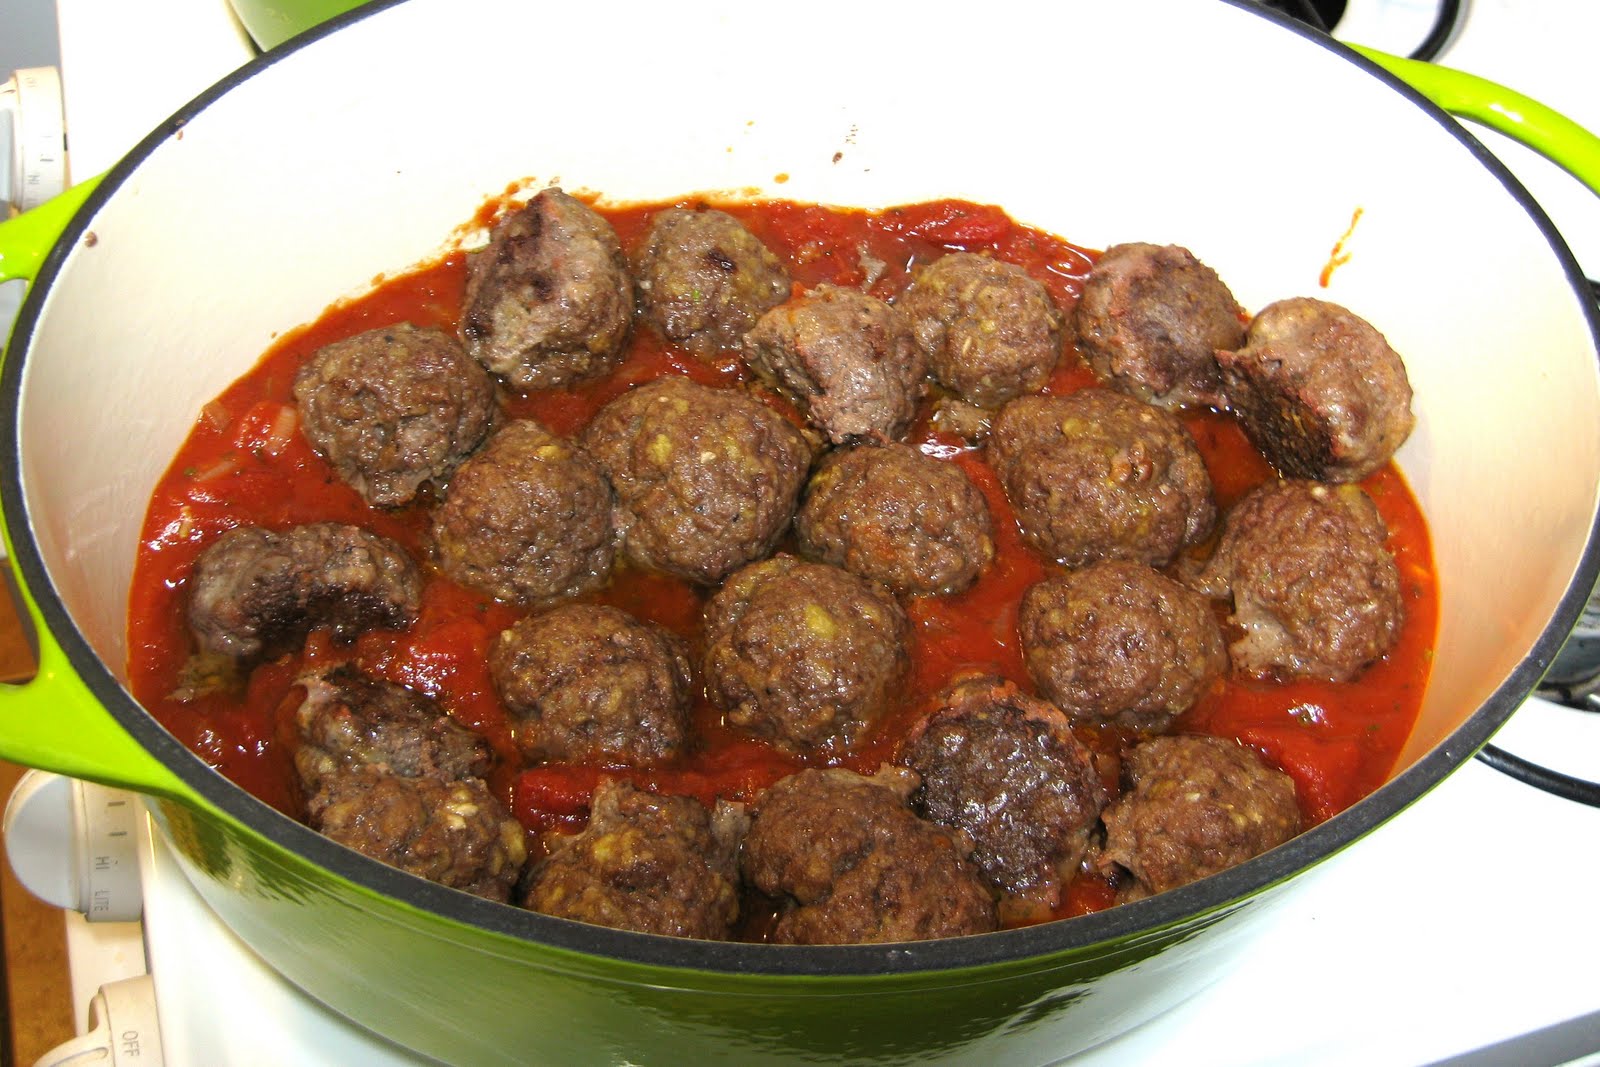
Preheat oven at 400⁰.  Combine the meat, eggs, saltine crumbs, garlic, spices, salt and pepper in a large bowl.  Mix together with hands.  Form each meatball about an inch and a half in diameter and place on a baking sheet, makes approx. 24 meatballs.  Place meatballs in the oven and bake for about 15 min.  or until browned.  Using a metal spatula; take meatballs off of baking sheet and place in marinara sauce in the Dutch oven.  Reduce heat to oven to 300⁰ and place the Dutch oven back in the oven for approximately 20 – 30 min. Serve over pasta or on a hoagie roll.

Meatballs in Marinara Sauce

Its been a hectic week, at least I ended up with a tasty meal and even tastier leftovers.

Enjoy the foods of your labor.  :-)

Spaghetti and Meatballs

Friday, May 27, 2011

Good, but not great mac n' cheese...

Creamy Mac and Cheese at Sunday dinner
If there is one thing I love is a great mac and cheese...its creamy, its cheesy, it is one of the ultimate comfort foods.  It accompanies southern meals with the greatest of ease,but it can still stand on its own as a meal unto itself. 

When it came to helping with Sunday dinner this past Sunday, I thought...what would go better with ribs than mac and cheese.  I decided to turn to Williams-Sonoma Comfort Foods, page 172... "Creamy Mac and Cheese". 

Here are the pictures and the results of what I made...

Ingredients for Creamy Mac and Cheese
The ingredients are pretty simple, as you can see in the photo above...milk, macaroni, cheddar, fontina, flour, butter, dried mustard, salt and pepper. 


Creamy Mac and Cheese
The picture above is after preparing the roux, adding the milk, the cheeses, the spices and of course the macaroni.  The sauce came together quickly.  At this point I was still sure that this would be the greatest mac and cheese ever; the sauce was creamy and everything tasted great.

Creamy Mac and Cheese
This is what the Creamy Mac and Cheese looks like topped with bread crumbs and taken out of the oven.  I had used Trader Joes Parmesan Toasts to create the bread crumbs.  I'm still feeling good about the recipe at this point.

Creamy Mac and Cheese
This is the Creamy Mac and Cheese at dinner.  It looks like the picture in the book...its good, but I have to admit; it tasted better before it went into the oven.  After coming out the oven and slightly cooling down by the time we ate...it just seemed dry to me, like the saucy goodness had baked right out of it.  I really liked the sauce and I plan on trying the recipe again, maybe adding a bit more cheddar and forgoing the whole bread crumb baking thing which I don't think it needs.  I will be trying this with in the next week or so, so stay tuned...I will post the recipe at that time with the changes I have made to it. 

Enjoy the foods of your labor.

Friday, May 20, 2011

The Frittata...

Potato Cheese Frittata
 Tonight was another frittata night in our house.  The easy eggie goodness, is popped into the oven giving me room to do other things on top of my barbie size stove.  It was suppose to be omlettes, with fingerling potatoes and asparagus.  I could not figure out for the life of me how to put three large skillets on the stove top at one time....I may be able to put 2 skillets on there at once, but 3...its just not happening.  So, instead I fell back to the trusted frittata in order to make space to get the asparagus sauteed.

Well, the frittata has been my fall back for awhile.  One morning, I decided that I would make a Spanish tortilla (eggs, thinly sliced potatoes).  I looked at recipes...I even got out the two skillets similar in size in order to flip the thing.  I don't know what came over me while I was frying up the potatoes...fear of flipping the thing...or maybe it was the fact I didn't want the whole thing to end up in the floor when I tried to transfer it from skillet to skillet.  What ever the case, the Potato Cheese Frittata was born.

Potato Cheese Frittata
For printable recipe, please click here
8  Eggs
2  Tbsp Heavy Cream
6-8  Golden Potatoes, thinly sliced
5 Tbsp  Olive oil
2 C  English Cheddar, grated
Salt/Pepper

Preheat over to 350.  In an 11 to 12" skillet, over medium heat add the olive oil, add the potatoes to the oil and season with salt and pepper.  In the mean time, while the potatoes are frying.  Whisk the eggs and the heavy cream together, add half of the grated cheese to the egg mixture, set aside.  Stir the potatoes in the skillet, when they are tender but still firm, add the egg mixture over the potatoes.  Make sure the mixture covers the potatoes evenly.  Let set over medium heat for a few minutes, top with the rest of the cheese and place in the oven for about 20 - 25 min or until done in the center.  Let set for a few minutes after removing from the oven, serve and enjoy.  Refrigerate leftovers.
Potato Cheese Frittata

Potato Cheese Frittata
So guess the moral of the story is don't fret, make a frittata instead.

Enjoy the foods of your labor.  :-)

Thursday, May 5, 2011

The Queen's Drop Scones...

Queen Elizabeth's Drop Scones
The Royal wedding seems to have stirred up a plethora of scone recipes on the net.  There was one in particular that caught my eye..."Queen Elizabeth's Drop Scones" posted on Simple Recipes which I follow on Facebook.  Apparently, I wasn't the only one who thought this recipe looked appealing; 2 days after it was up on Facebook my sister made the Queen's Drop Scones and posted it on her page (she too follows Simple Recipes on Facebook).

Well, I made mine last night; deciding to use two of my favorite teacups for measures (like the Queen's recipe).  Instead of the pancake like batter that was described on Simple Recipes, I ended up with something a bit more sconie (biscuit like) if you will.  I think by using teacups to measure my flour, I used a tad more flour than what was called for...and before you ask...no I didn't weigh the flour to verify the measure and no, I didn't use a Starbuck's coffee mug to measure out the ingredients, they were actual English teacups that you see in tearooms or your grandmother's study.  Overall, I was really happy with this skillet scone (the taste and texture for a scone was spot on), but I may try to bake them in the oven the next time. 

Prepping to make Drop Scones
Queen Elizabeth's Drop Scones from simplyrecipes.com
For printable recipe, please click here
4 teacups Flour
4 Tbsp Sugar
2 teacups Milk
2 whole eggs
2 tsp Baking Soda

3 tsp Cream of Tartar
2 Tbsp melted Salted Butter

In a large bowl whisk together the flour, baking soda, cream of tartar, and salt; set aside.  In a another medium bowl, whisk together the eggs and sugar; then whisk in half *(1 teacup) of the milk.  Make a well in the middle of the flour and pour in the milk egg mixture. Whisk until smooth, adding more milk until you get the right consistency *(I actually added the other full teacup of milk and it was pretty thick) - thin enough to spread on the pan, but not so thin as to run *(the consistency I got was like a wet dough) . Fold in the melted butter.

***To cook scones on the stovetop:
Heat a griddle or large cast iron pan on medium to medium low heat. Coat the pan with a little butter, spreading it with a folded over paper towel. Drop large spoonfuls of batter on the griddle to form pancakes. When bubbles start to appear on the surface (after 2 to 3 minutes), use a metal spatula to flip the pancakes over. Cook for another minute, until lightly browned. Remove to a plate and cover with a clean tea towel to keep warm while you cook the rest of the drop scones. 
 
***To bake in an oven:
Preheat oven to 400°.  Drop about 2 Tbsp of batter/dough on a baking sheet for each scone.  Bake for 14 min or until golden.
 
Makes 14 to 16 scones.

* My notes
***Baking/cooking methods
 
Queen Elizabeth's Drop Scones
By cooking them in the skillet it makes heating them up easier since they can be popped into a toaster.  As a matter of fact; I had one this morning, covered in........JAM! 

Enjoy the foods of your labor.  :-)